

Finishing the Violin
Wiring:
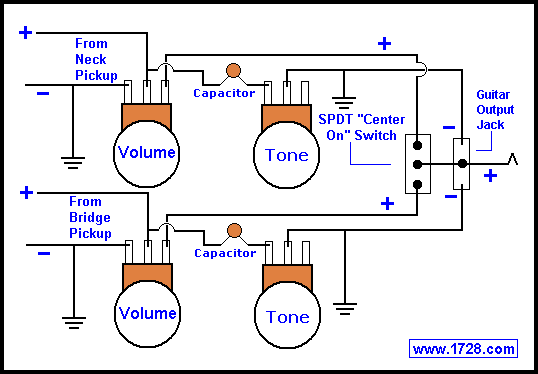
After choosing to make humbuckers, i figured that the wiring i would use would be a derivative of the wiring used on guitars with humbuckers. Knowing i was effectively going to have two humbuckers i simply chose a Gibson wiring diagram that was suited for this.


As you can see i directly used the above schematic. The only difference being that instead of having a bridge and neck pickup, there is a left and right pickup. Also i ended up not wiring in the switch because i figured that a violinist would generally want to use all 4 strings and if not, he could just turn the volume on one half all the way down.

The 500 kOhm guitar potentiometers that were used. I also used two .05uF capacitors on the tone circuits.

There is little room to spare within the body cavity, all of the wiring was kept as short as possible to fit inside. For an output jack a chose a BNC connector that i had lying around. I chose this because i wanted something unusual. I should have used a standard 1/4 inch mono jack, it would have been easier.
The Finishing Touches:
I needed something to cover the body cavities. I could have used more veneer, but I know nothing could look as cool as brass plates. I used thin (20 gauge) brass for the plates and cut them out with a jewelers saw. I filed the edges and polished them.

The bridge was made from a piece of maple (the hardest wood i could find at the time was maple, i want to remake it from aluminum or ebony) and was colored black with an ebonizing fluid usedin violin making. even with the hard maple, the E string will cut through the wood.

Seen here is the BNC output jack and the tuners. The tuners fit through the hols in the brass plates. By attaching them here, all of the strings are grounded and plates are attached to the ground circuit providing some shielding for the electronics.
All of the bolt hole patterns were done using a milling machine with Digital Read Out. This made it easy to create symmetrical patterns and precisely matching holes for the tuners.

The knobs were machined from more aluminum "femur reamers" (inserts from hip replacements)

I painted any recessed area with black paint prior to the polyurethane. This adds a little contrast to the violin.


After I had finished, I plugged it in and tested it. It made a sound, but it made a constant buzzing sound that got worse when i touched any of the metal. Unfortunately, i had to hold off on fixing it right away because the school semester started again, however i spent the next couple moths researching and trouble shooting the problem. Eventually i realized that the sound it was making when i touched it is the same sound that the Amp makes when I touched the tip of the input cable. I realized that maybe the connections were reversed on the output jack. However, a quick continuity test on the cable showed that the cable i was using was wired to switch the ground and core signals. Slightly baffled i made my own cable and a couple of minutes later the violin sounded crystal clear! Finally, success. From now on, i will never just assume that a cable does what it should.
After completing the violin project i built a Case for it and designed the logo to match the case.


Comments (0)
You don't have permission to comment on this page.